| |
| |
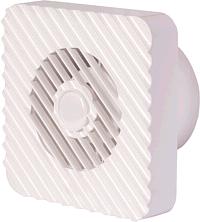
| AIRLUKS Zephyr Series (Bathroom, Chimney, Wall and Ceiling Type) 100Z 120Z 150Z |
| |
| The ZEFIR range of exhaust duct fans are ideal
for bathrooms and toilet applications. The range can be extended with the
electronic control systems with photocell, timer or humidity sensor and the
fans are compatible with all European and international standards.
|
|
| |
Technical data:
|
Voltage
|
~220-230V/50Hz
|
Consumption
|
19 W
|
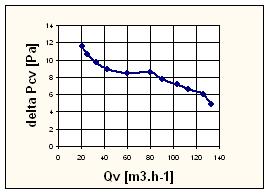
Air flow
|
100 m3/h
|
Class
|
II
|
IP
|
X4
|
Acoustic pressure
|
38,5 dB (A)
|
Revolutions
|
2550 (rpm)
|
Weight
|
|
A
|
152 mm
|
B
|
152 mm
|
C
|
27 mm
|
D
|
100 mm
|
L
|
60 mm
|
|
 |
| |
More details:
|
|
|
|
|
|
|
|
|
Fan versions:
|
|
Model
|
P
|
W
|
F
|
T
|
H
|
ZEFIR 100
|
+
|
+
|
-
|
-
|
-
|
ZEFIR 100B
|
-
|
-
|
-
|
-
|
-
|
ZEFIR 100E1
|
-
|
-
|
+
|
+
|
-
|
ZEFIR 100E2
|
-
|
-
|
-
|
+
|
-
|
ZEFIR 100E3
|
-
|
-
|
-
|
+
|
+
|
Denotations:
·
P - cable with a plug
·
W - pull cord switch
·
F - photocell
·
T - timer
·
H - adjustable humidity sensor
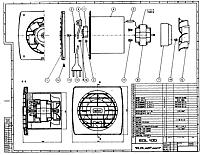
Technical drawings:
|
|
| The fans extended with the electronic
control systems have a mounted timer. Fan activation depends on the control
system.
|
 |
 |
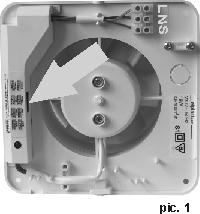
E1- photocell (pic.1)
starting the fan is done
by the change in the
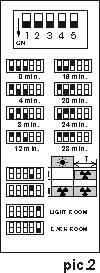
light intensity in the area where the fan is installed. The switches 1,2,3
are for setting the time of the fan activity. Given lengths of time can be
set by moving the switches according to (pic.2).
The 4 switch is for
setting two automatic cycles of the fan activity.
I. The switch in a position (ON): the
fan starts itself by switching off the light in the ventilated area and works
for the period of time set by the time-lag switches.
II. The switch in a possition (OFF): the fan
starts itself by switching on the light in the ventilated area and works for
as long as the light is on. After the light is turned off, the fan keeps
working for the length of time set by the time-lag switch.
The 5 switch is for adjusting the system sensitivity to the lighting. The
position (ON) is for dark areas, while the position (OFF) is for partially
lit areas. The system works on condition that there is a significant change
in the lighting. |
|
|
| |
E2- timer (pic.5)
the fan is activated after the light is switched on (1st version of fan
installation) or after pressing the switcher (2nd version of fan
installation) look in the (pic.3). After turning off
the light or switcher the fan works for the time allocated by the adjustable
screw.
|
| |
 |
| |
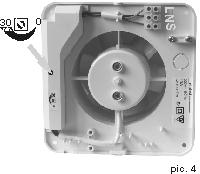 |
Fan models with
timer, set the required length of time for the fan to run after the fan is
switched off by first ensuring the mains power is isolated, and then with the
cover of the fan removed insert a small
screwdriver into the
aperture marked and slowly rotate clockwise or anti-clockwise to increase or
decrease the timer setting from 0 30 minutes.
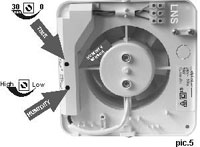
E3-humidity sensor (pic.5) the fan is
activated automatically after receiving expected humidity threshold or
switching on the light or switcher connected according to the (pic.3).
The fan works until the switcher or light is on or the humidity above the
expected threshold. After turning off the light or switcher and when the
humidity is below the expected threshold the fan works for the time allocated
by the adjustable screw.
The time interval is
between 0 - 30 min. The fan has adjustable humidity knob and the humidity
threshold could be set up between 30-80%. Please set up
all required parameters before use.
The humidity sensor and adjustable knobs are situated in the electronic PCB
(pic.5). After connecting the fan with the wiring
system ~220-230V , the right knob should be turned on position 0min. and the
left one on the low humidity. This settings should activate the fan. The fan
works until the humidity threshold is reached by turning the screw very
slowly to high humidity position. When the local humidity level is reached
the fan should stop after 2 seconds. Then the humidity knob should be turned
10o more to high humidity position. If the fan is not activated it means that
the humidity threshold is below 30%. It is possible
in winter time when the heaters make the air inside the house very dry.
Please leave the humidity knob in position low and set up the timer knob in
expected position. The fan should be tested by blowing at the humidity sensor
from distance about 10cm. In this moment they should start
working.
|
 |
|
| |
|
| |
|
| |
|
| |
|